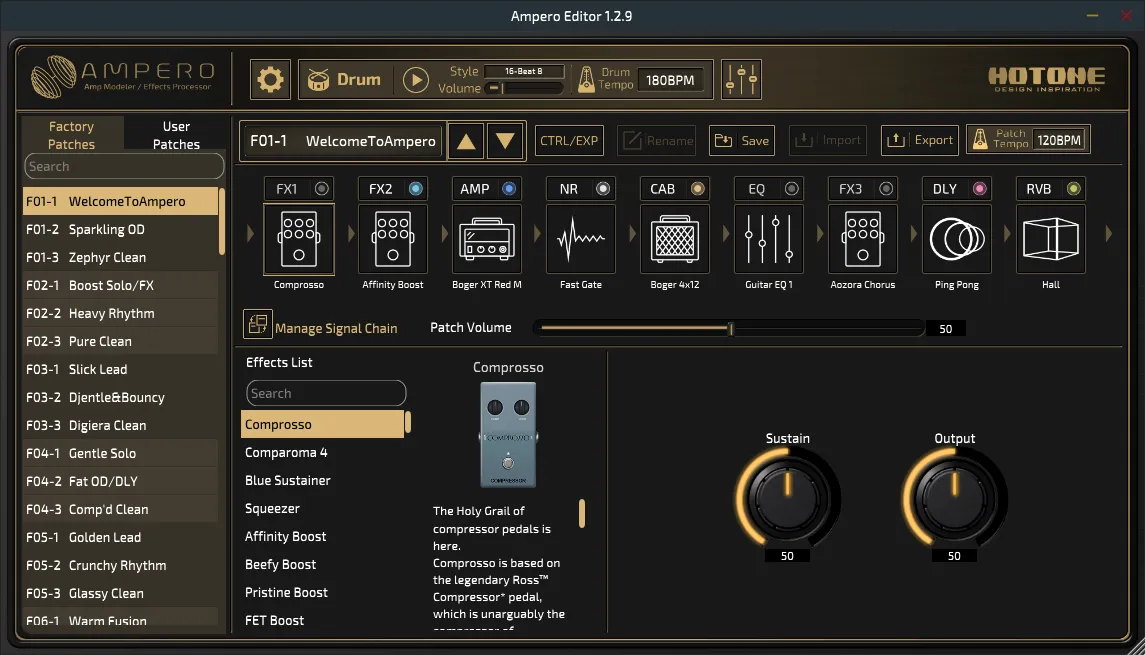
Ampero amp modeler & effects processor is a game changer. It's heart pounding amp modeling and uber quality effects are powered by the new-gen CDCM HD (Comprehensive Dynamic Circuit Modeling High Definition) and F.I.R.E. (Field Impulse Response Enhancement) system, bringing you the absolute best the world has to offer. Packaged in a cool, thin case with a 4-inch hi-def color touch screen, Ampero delivers all the real sounds of rock past and present.
Driving Ampero is Hotone's innovative CDCM HD (Comprehensive Dynamic Circuit Modeling High Definition) and F.I.R.E. (Field Impulse Response Enhancement) system. Built on Hotone's powerful XTOMP platform, acclaimed Binary series, and breakthrough VStomp Amp virtual plugin, the new-gen CDCM HD & F.I.R.E. system showcases Hotone's new high-shelf circuit modeling methods.
Mainstream modeling methods are generally based on static state circuitry modeling or "black box" theory, which just "come close" to the modeled sound. CDCM HD & F.I.R.E. employs a complex system based on dynamic feature modeling. In this matrix, the technology "rebuilds" the entire circuitry using modeled electronic components, resulting in a tone that is vivid, accurate and expressive. More than that, the new system enhances the relationship between amps and PA systems, delivering a realistic feel and response you've never before experienced on digital gear.
Ampero is powered by a huge dual-DSP platform running Hotone's proprietary CDCM HD & F.I.R.E. modeling system.
● Main Processor - Analog Devices® SHARC® series
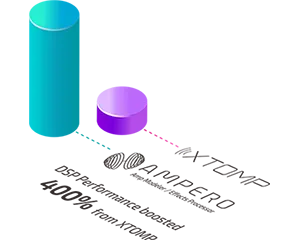
A powerful Analog Devices® 4th gen SHARC® series DSP is dedicated to the audio engine. Compared to XTOMP, this processor features increased performance and hardware-based audio processing accelerator modules, which makes it easy to handle multiple XTOMP-grade high quality effect algorithms.
● Co-processor - NXP® RT series
The NXP® RT series crossover co-processor runs on the ARM® Cortex®-M7 core.
The co-processor not only helps processing audio streams, but also powers the touch screen display, USB I/O, and other functions.
Ampero employs a special design input mode selector that is designed not only for electric instruments, but also for acoustic players and even keyboard players! Simply connect your instrument to the input jack, select a mode for your instrument, pick a dedicated electric/acoustic/FX preset and you're ready to roll.
No need to carry an extra acoustic anymore! Ampero comes with advanced "black tech" acoustic simulation algorithms. Used along with built-in acoustic IRs and acoustic simulation presets, you can easily transform your electric instruments into miked up acoustic masterpieces: steel string, nylon string, resonator, even ukulele!
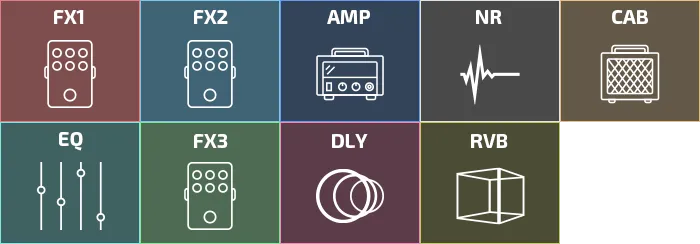
Ampero can handle up to 9 effect modules simultaneously with its flexible FX1, FX2 and FX3/MOD effect modules for the best authentic stereo effect processing experience. Ampero shares the same growing modeling/original effects library as our all-powerful XTOMP pedal with even more goods:
● 242 effects ● CDCM HD & F.I.R.E. modeling effects including: 64 amp models/60 cab models/100+ legendary pedal models/Next-gen mic position and microphone type simulations ● User custom IR loader with 3rd party IR support ● 50+ Hotone original effects (incl. high quality drive/dynamic/filter/mod/delay/reverb models and more)
Suggested Setups
Here are some common setups to get the most out of Ampero.
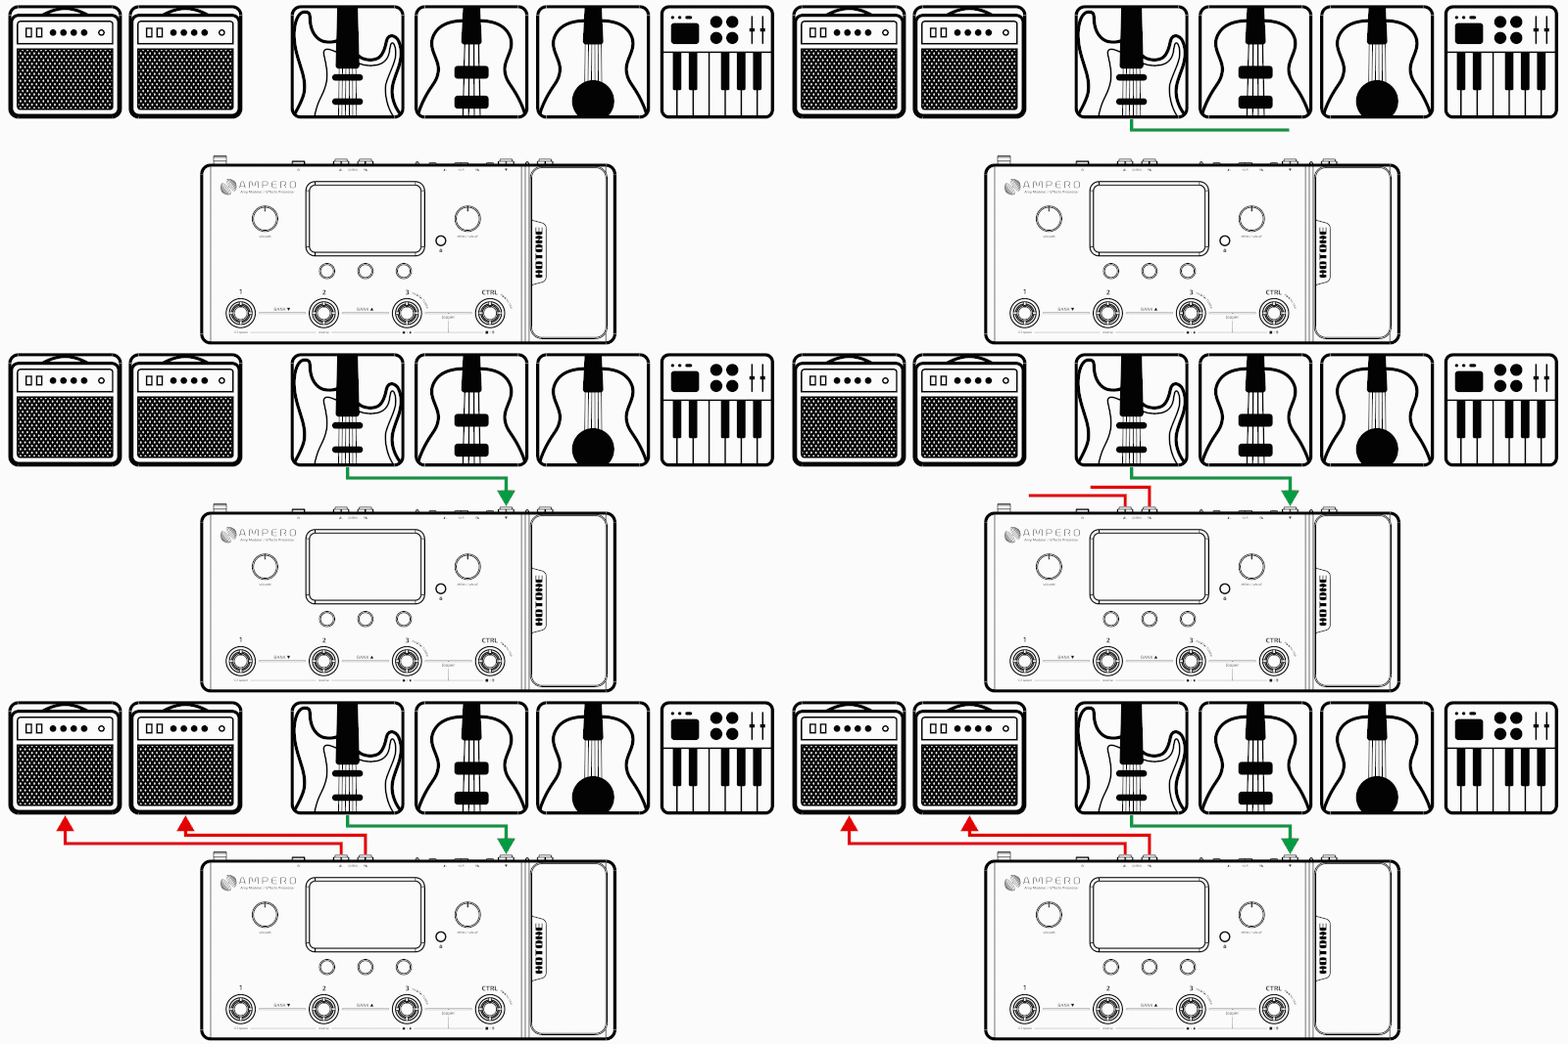
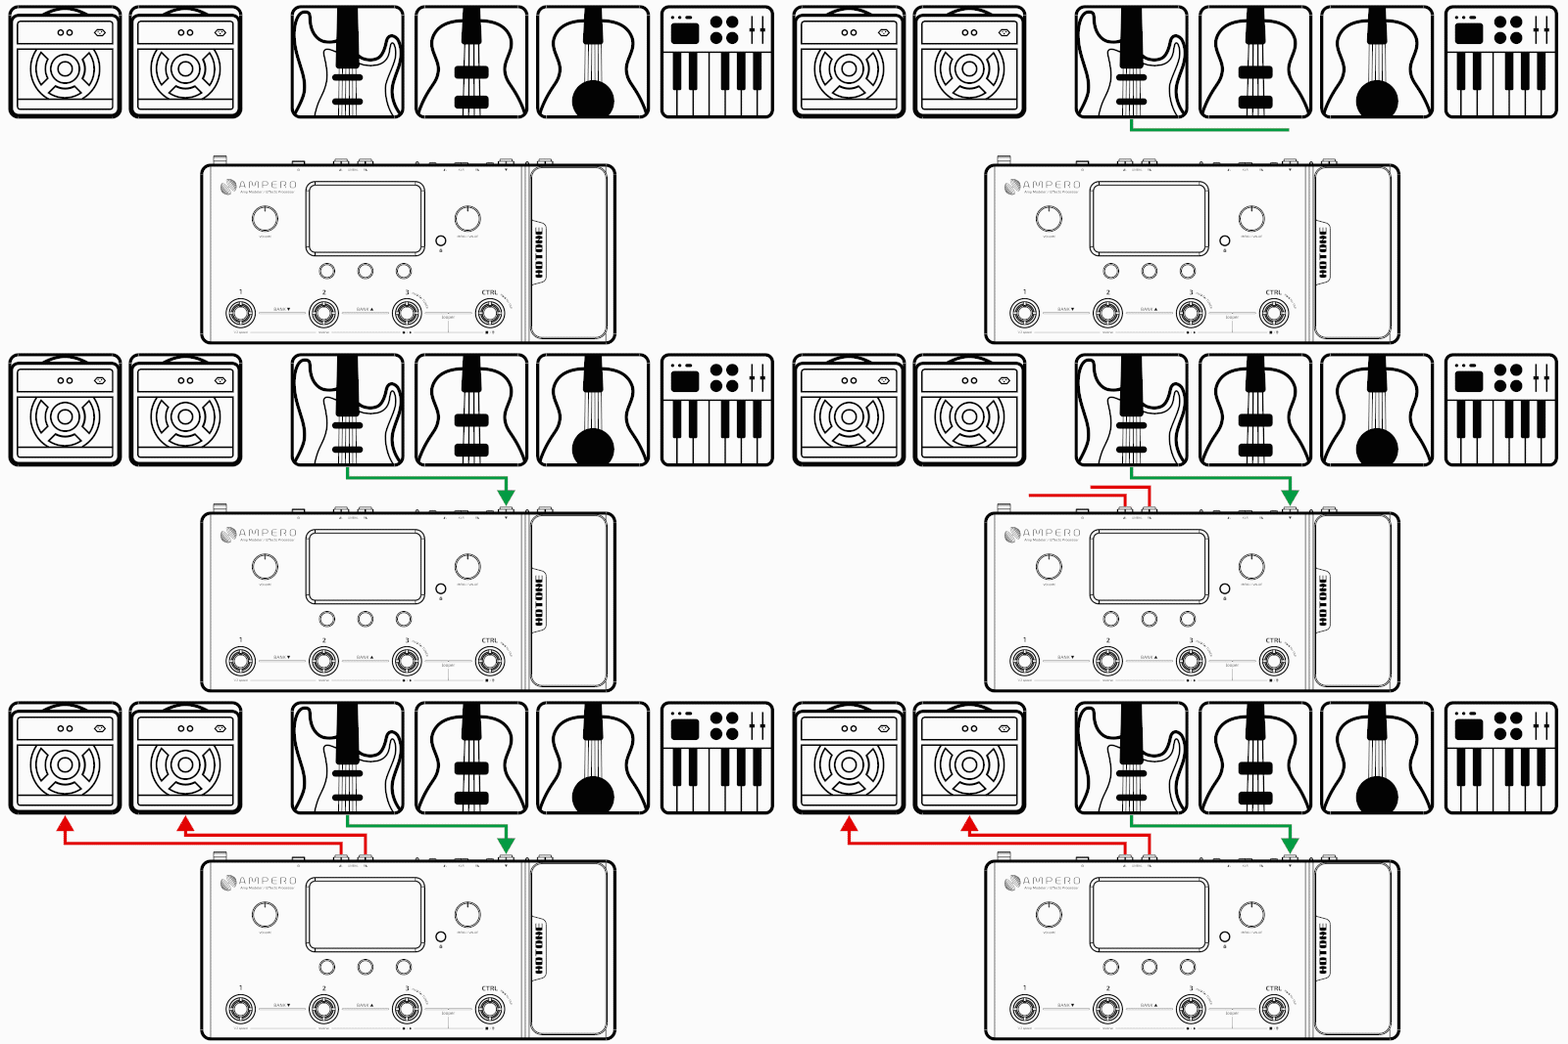
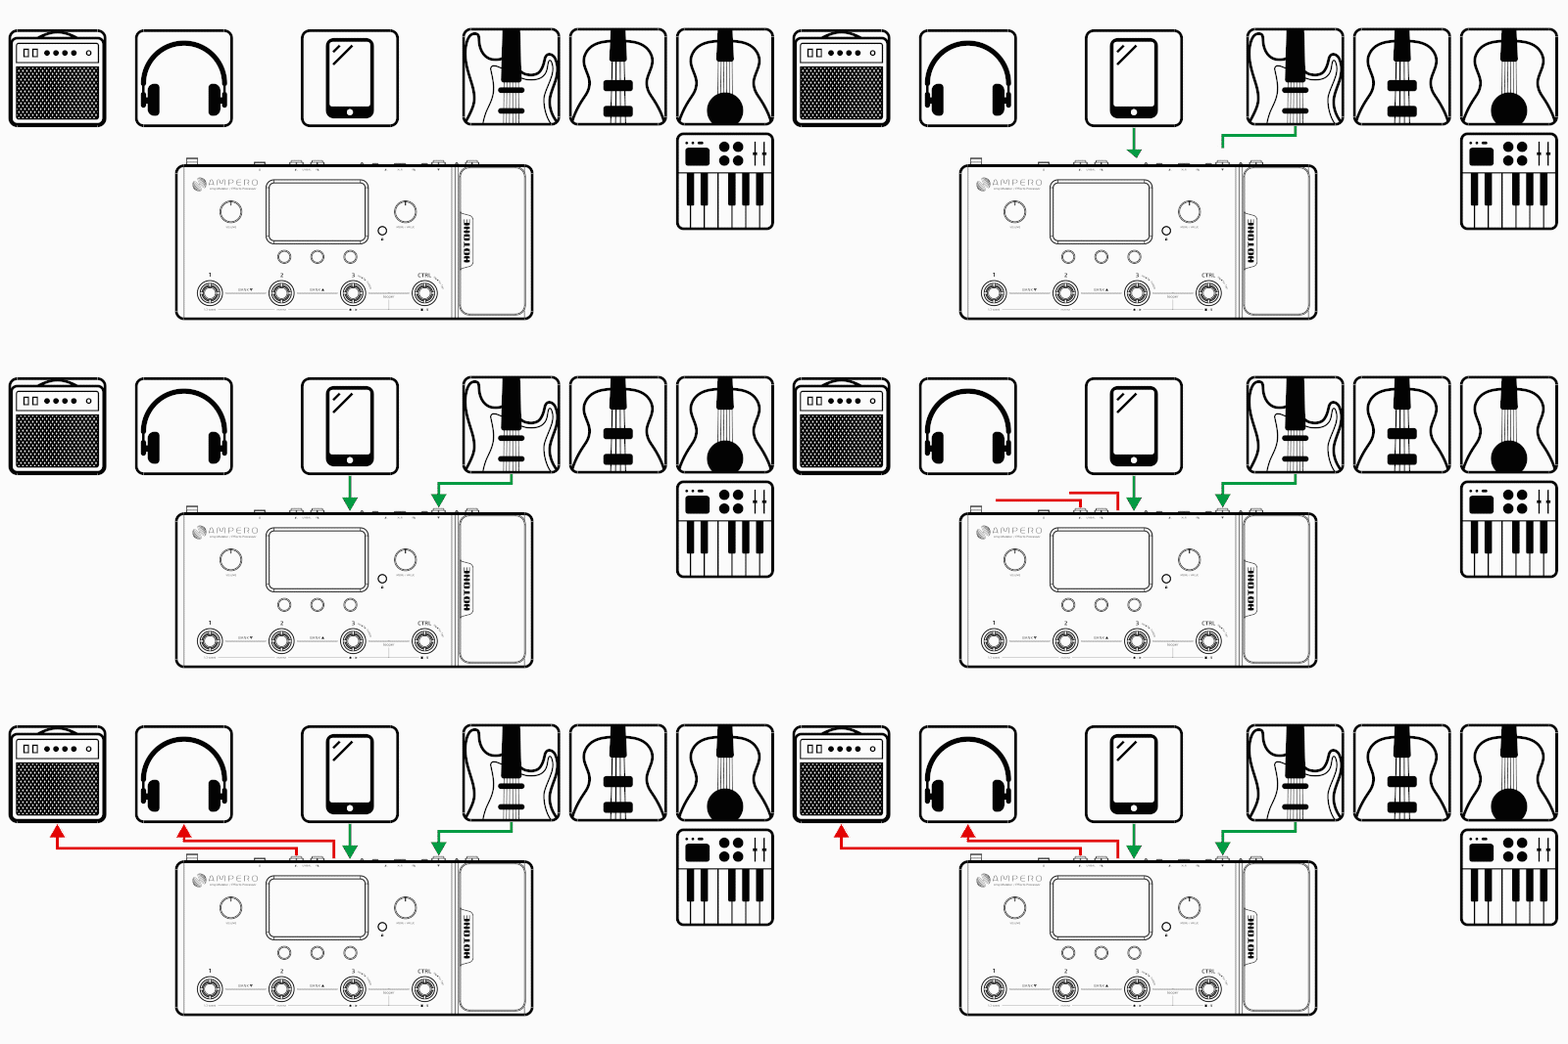
Using with your instrument and amp
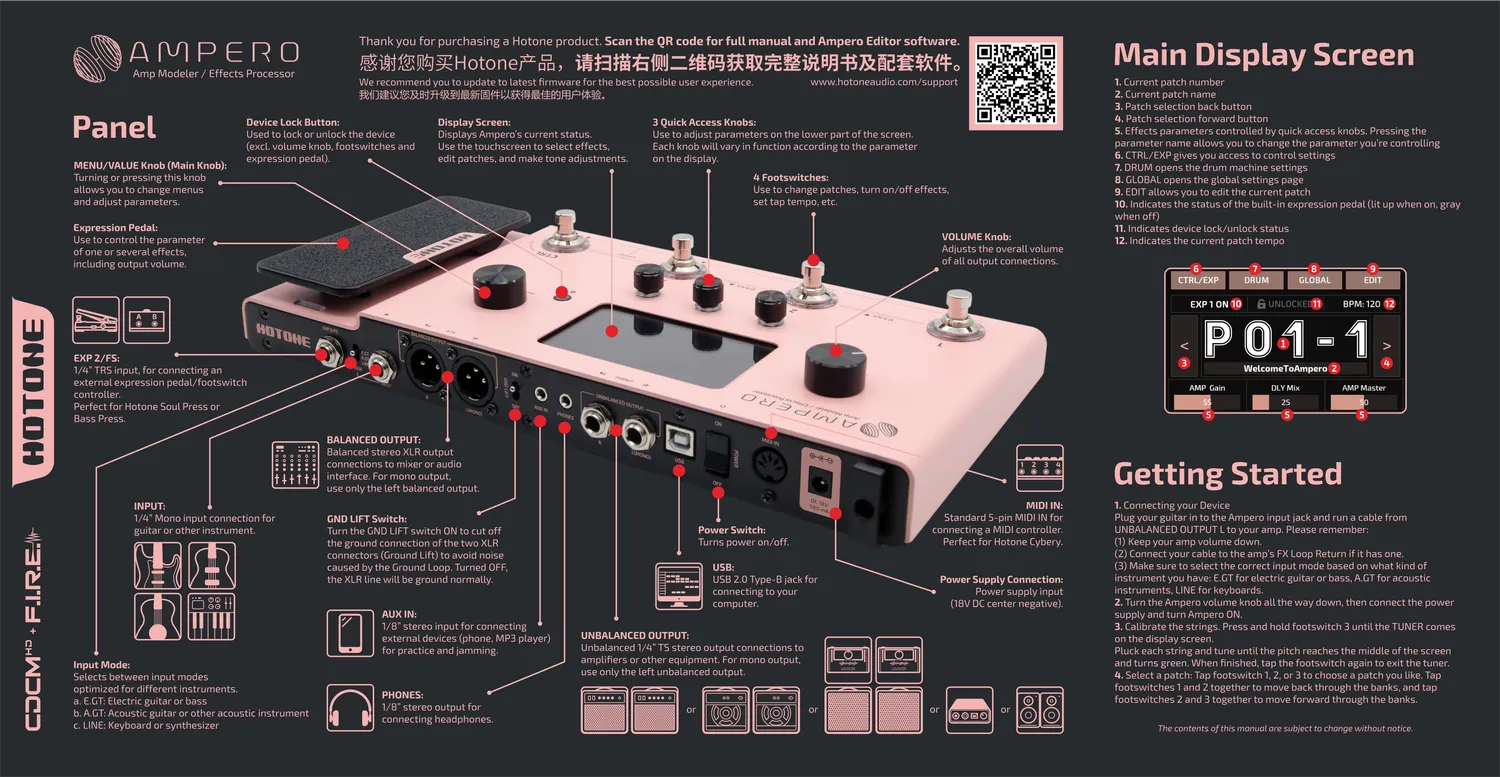
Plug your instrument into the Ampero instrument IN jack, and run a cable (or two) from the unbalanced OUT to your amplifier(s). If you have one amp, run the cable from the left output. For best results, turn off the AMP and CAB modules on Ampero.
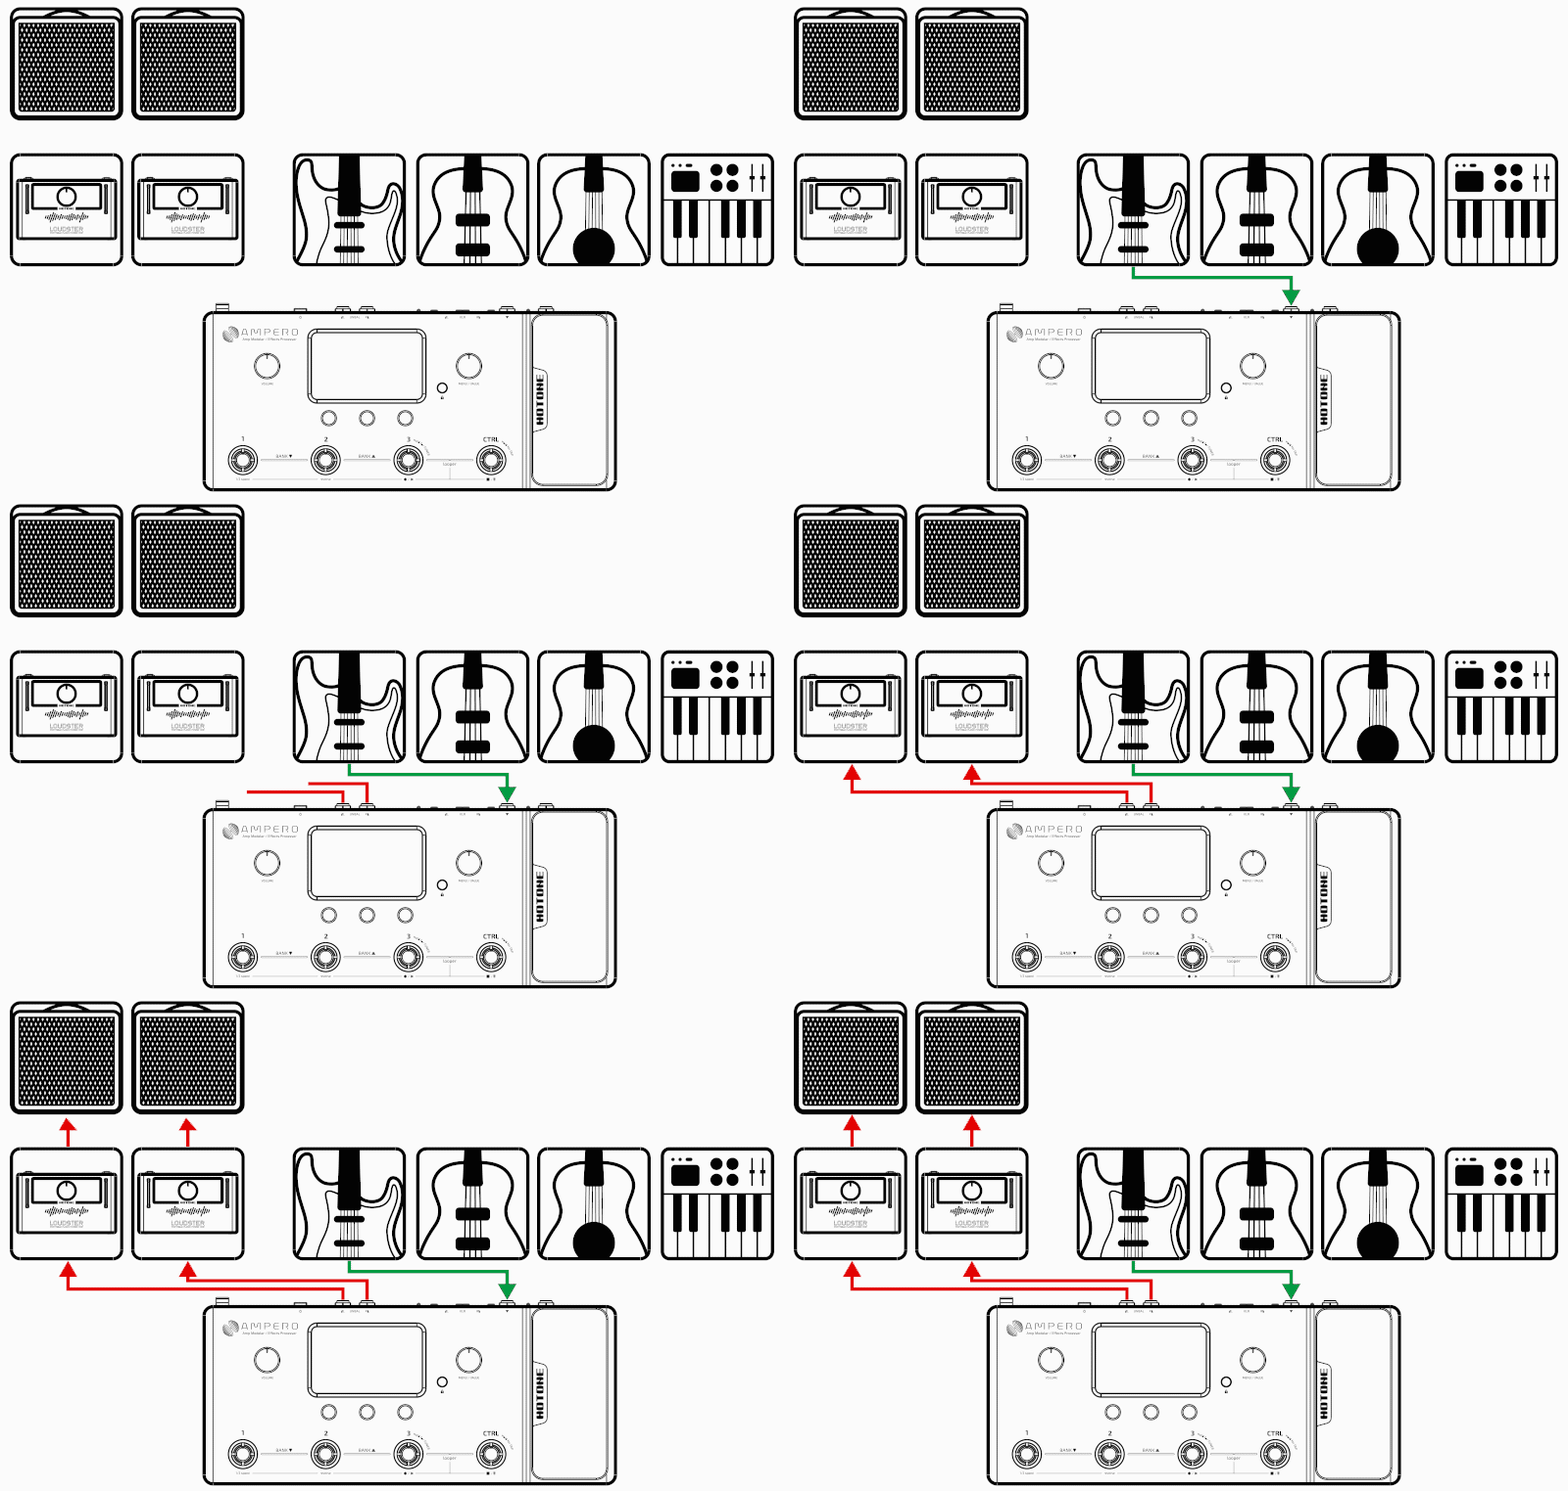
Connecting to your amp's RETURN or Power Amp (Loudster) INPUT
Connect the unbalanced outputs to your amp’s FX Loop Return input or post amp input. If you have one amp, run the cable from the left output. For best results, turn off the CAB module on Ampero.
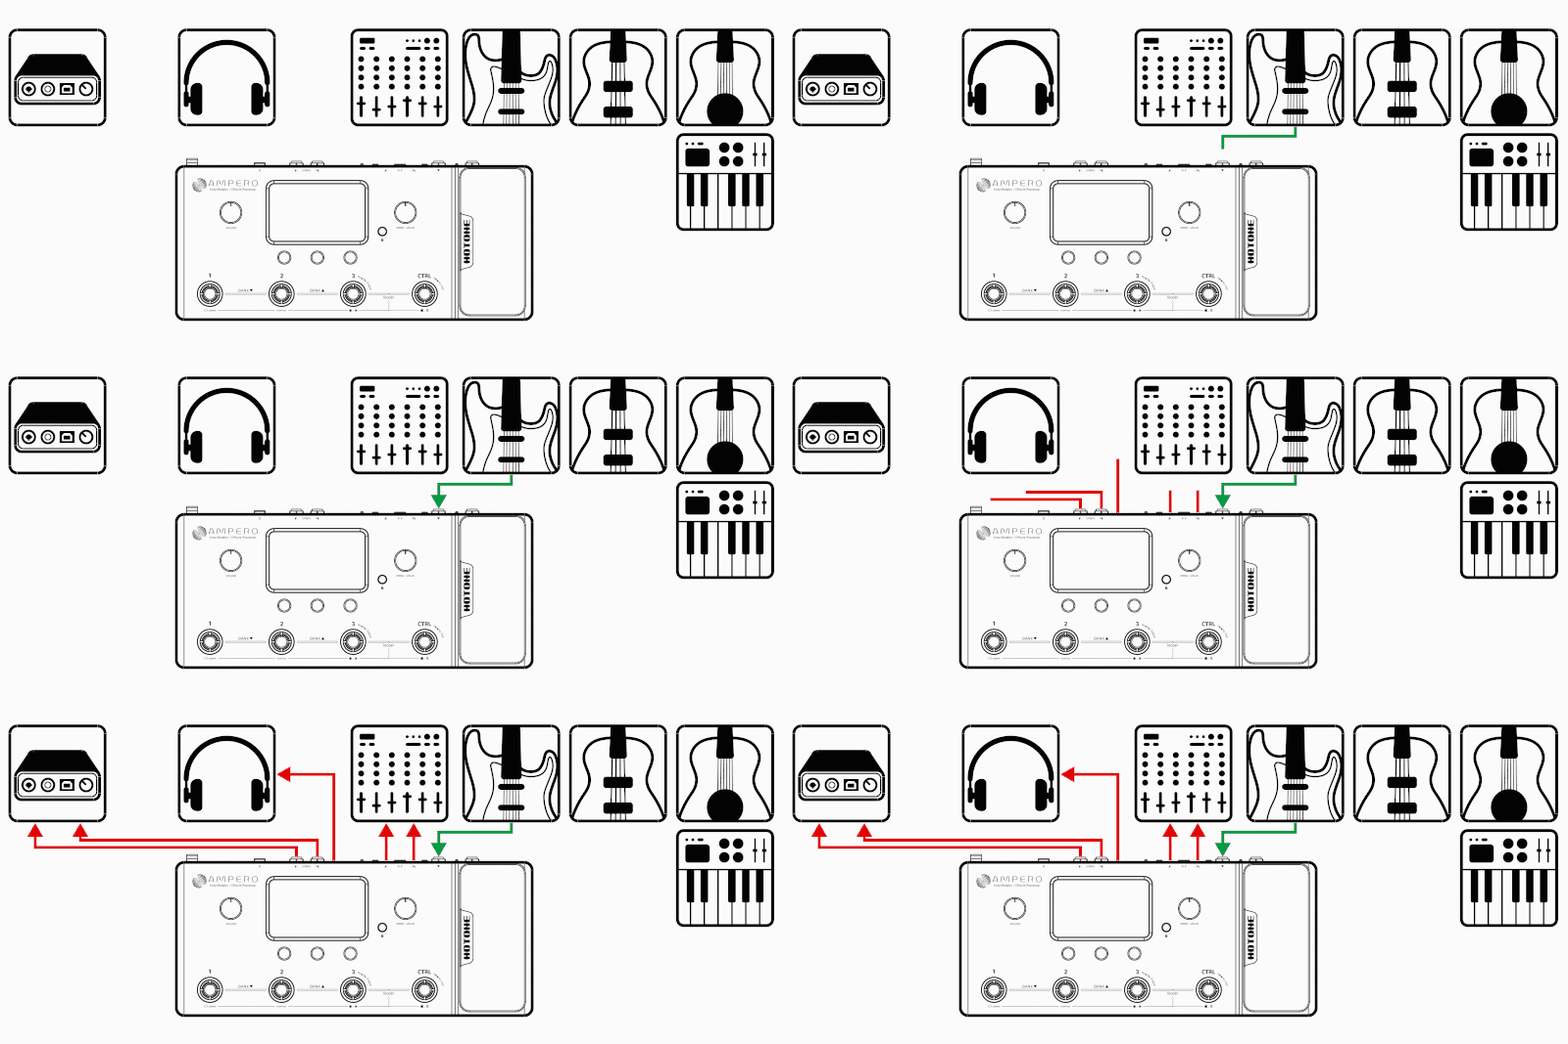
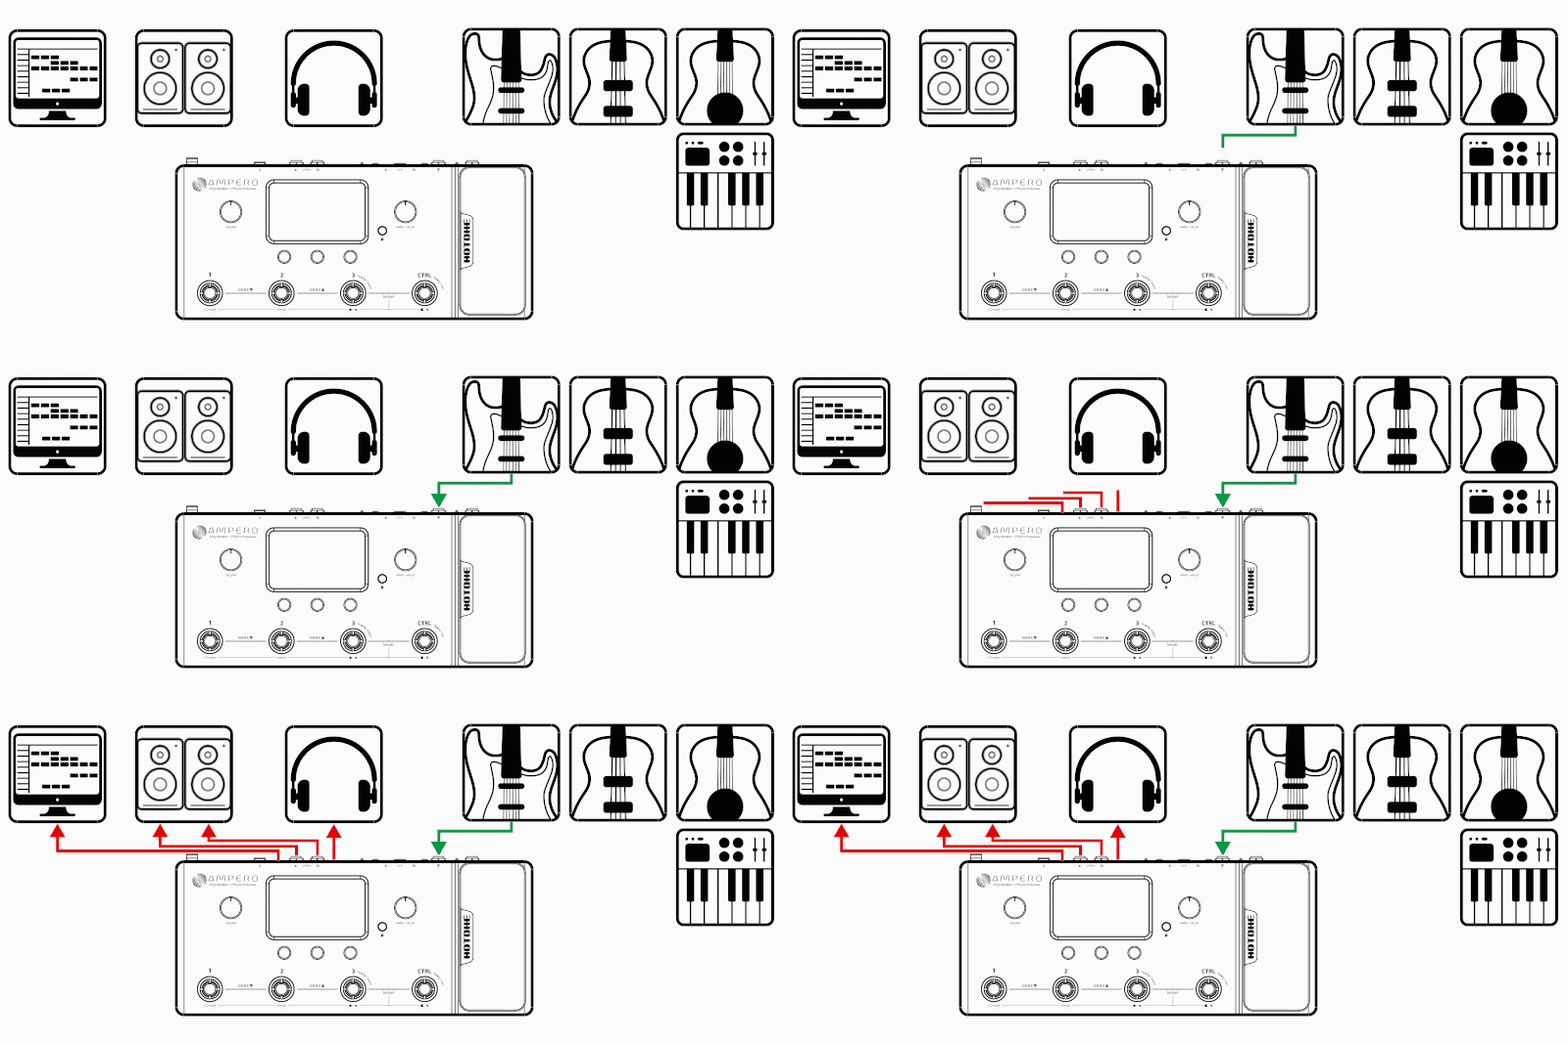
Connecting your mixer, interface, headphones, and other equipment
Connect Ampero's balanced or unbalanced outputs to your mixer or audio interface's corresponding inputs. Use the balanced outputs for optimal signal to noise ratio. If you want to send a mono signal out, use Ampero's left output channel. To prevent damage to your equipment, make sure the mixer or interface channel's volume is muted before making any connections. If you experience unwanted noise when using the balanced outputs, it is likely produced by the ground loop. In this case, turn on Ampero's GND LIFT switch. Turn the Ampero output volume all the way down before connecting headphones to prevent harm to your ears. Ampero's headphones out comes with hi-fi stereo sound. For best results with headphones, turn on Ampero's AMP and CAB modules.
Connecting to your computer as an audio interface
Connect a USB cable (not included) from Ampero to your computer. For PC systems before Windows 10, you'll need to set up the driver. Ampero is plug and play for Windows 10 or later versions and macOS. Run line out cables to your monitors, or use headphones.
Using the AUX IN line
Connect a male-to-male 1/8" stereo cable from your audio source (phone or MP3 player) to Ampero's AUX IN jack. This line will be unaffected by Ampero's internal effects. Note: if you are running a mono line out, you will only hear a mono version of your AUX source.
Ampero is designed to be simple and intuitive so you can just start playing.
The straight-forward user interface features a 4-inch 800 x 480 touch screen with dynamic color display and three quick access knobs for hands-on parameter tweaking.
Ampero is incredibly easy to set up and program.
Features
✪ Compact, easy-to-use amp modeler & effects processor ✪ New-gen CDCM & F.I.R.E. modeling system ensures high end tonal expressiveness and realistic playing experience ✪ Powerful, upgraded dual DSP-powered platform ensures excellent sound quality ✪ 24-bit signal processing, up to 120dB S/N ratio ✪ 4-inch 800 x 480 sharp color touch screen with instant control ✪ 18V DC high voltage power supply for huge dynamic range
18V power supply included ✪ USB port for firmware upgrading, loading/editing/managing effects/IRs via free Mac/PC software or for use as an USB audio interface ✪ 242 effects based on stunning XTOMP effects library ✪ CDCM HD & F.I.R.E. modeling effects including: - 64 amp models - 60 cab models - 100+ legendary pedal models - Next-gen mic position and microphone type simulations - User custom IR loader with 3rd party IR support ✪ 50+ Hotone original effects (incl. high quality drive/dynamic/filter/mod/delay/reverb models and more) ✪ 198 presets ✪ Built-in drum machine with 100 patterns ✪ Built-in looper with max. 100 seconds recording time ✪ 4 assignable footswitches with halo LEDs ✪ Built-in expression pedal ✪ Authentic stereo output processing ✪ Line, XLR and headphone I/O for various connection needs ✪ MIDI IN and EXP2 jack for connecting external controllers ✪ Road-ready, light-weight aluminum casing
Specifications
Digital Audio Signal Processing
24-bit depth, 44.1kHz sample rate
SNR
120dB
Effects
242
Effects Modules
Total of 9 simultaneous
Patches
198 (99 user patches, 99 factory patches)
Looper Time
Mono 100 seconds, Stereo 50 seconds
Internal Drum Machine
100 Rhythm Patterns
Inputs
One 1/4" Tip Sleeve (TS) Instrument jack, with three way input mode selection
One 1/8" Stereo Auxiliary In (Aux In) jack
One 1/4" Tip Ring Sleeve (TRS) Expression Pedal input jack
One Standard 5 pin MIDI input jack
Outputs
Two 1/4" Tip Sleeve (TS) Unbalanced Stereo output jacks
Two XLR Balanced stereo output jacks, with ground lift switch
Ampero and Ampero One come with their own audio interface capabilities, which means you can use them to record directly to your computer and more. So how do you use the Ampero series audio interface function correctly? How do you set up and connect your pedal, instrument, and computer software properly? The answer is as follows:
Follow these steps test the audio interface function of the Ampero Series:
1. Make sure that listeningdevices such asspeakers/headphones are connected to Ampero
2. Check that Ampero's volume knob/instrument volume knob is on
3. Check that Ampero's latest audio interface driver is installed,and connect Ampero directlyto the USB port on your computer (if it's a desktop, connect to the USB behind the encasement).
4. Do not connect to your computer via USB hub (or splitter), and try not to use extension cables.
5. Make sure to use the original USB cable supplied with the unit.
6. Make sure that the audio hardware of your computer/playback software/audio editing software (DAW) is set up as Ampero. For PC users, select the HOTONE AUDIO USB Audio Device driver (i.e. the ASIO driver officially available from Hotone) when setting up the DAW.
7. Make sure that the hardware input and output settings for your computer/playback software/audio editing software (DAW) correspond to Ampero one-to-one.
8. Make sure that the input and output settings on the track you are using in the Audio Editing Software (DAW) correspond to Ampero one-to-one
If it still doesn't work, try a different USB port, USB cable, or another computer.
FAQ
1. The computer does not recognize the Ampero device, the audio interface function does not function, and the Ampero Editor does not recognize the hardware.
Step 1: Connect Ampero to your computer, then turn on Device Manager and select the Sound,Audio Devices, and Game Controller sub-options.
Step 2: Find all the devices associated with Ampero and uninstall the device drivers for all the devices involved.
Step 3: Uninstall all Hotone drivers.
Step 4: Disconnect Ampero from your computer and restart your computer (restartingis not necessary, but it is recommended).
Step 5: Reinstall the latest version of the Hotone ASIO driver (from the official website). It is important not to connect Ampero to your computer yet.
Step 6: After the drive installation is complete, connect Ampero to your computer to see if the problem is resolved.
If it's still not resolved, try using a different USB port on the same computer or try another computer.
2. The recording signal is too low.
You can adjust the recording volume option on Ampero or on Ampero Editor by adjusting the recording volume option, or you can increase the preset volume appropriately to further increase the recording volume. Be careful not to overload the signal by making the recording level too high.
3. You hear two sounds when you turn on the listening function on the Audio Editing Software (DAW) channel.
This is due to the sound (faster) and the sound (slower) overlay that Ampero sends back to itself. To avoid this problem and increase the accuracy of your recording, we recommend that you turn off listening on the channel and listen directly to the sound (i.e.hardware listening) from Ampero itself.
4. Using Ampero as an audio interface, the monitor listening volume cannot be directly adjusted in the system.
In order to ensure optimal cross-platform compatibility, we have disabled the system volume adjustment function. We recommend that you adjust the listening volume option on Ampero or in Ampero Editor by selecting Global Settings - USB Audio. If you are a PC user, you can also adjust the listening volume by opening the console in the software driver.
5. Some systems are not available for Ampero drivers after an update.
Please contact us if this happens so we can track your situation. If the issue is caused by a compatibility change due to a system upgrade, we will introduce an upgrade patch as soon as possible to help you resolve the issue.
2. Noise related issues
Noise problems caused by electric currents have long been a headache for many musicians. Noise issues often have complex and common causes, and many times it is normal for a certain amount of undersrance to occur after a device is powered on. The first step is to not panic. As long as the noise causes and the equipment characteristics can be understood, noise can usually be eliminated or reduced to an acceptable degree.
We collected user feedback from a number of platforms and organized a set of noise troubleshooting solutions to help you better use your audio equipment.
Before you start troubleshooting, we recommend that you upgrade your Ampero or Ampero One to the latest firmware, which you can view in your device's Global Settings menu.
As of the time this article was published, the latest firmware version information is:
Current noise can be caused by the following problems:
1.Guitar electronics
(1)If you are using a single coil electric guitar, it is normal to have current noise unless the single coil pickup is a noiseless pickup.
(2)If you experience loud current noise with a dual coil or noiseless pickup, try placing your hand on the strings and then release your hand (do not touch any metal parts of the body when releasing). Observe whether the hum has changed in both states. If the hum does not change with your hand on or off the strings, the connection is probably good, and there may be a problem with the grounding of your instrument circuit.
(3)If your instrument does not have pickup wiring shielding, or if the cable shielding is not very good, when the instrument is closer to the effects box, you can try to move slightly away from the device or change the direction of the guitar. This should significantly reduce the current noise. This type of noise is caused by external electromagnetic interference.
2.Instrument cables
We strongly recommend that you use high-quality professional instrument cables, as low-quality instrument lines often introduce a large amount of noise that prevents the device from working properly. At the same time, keep your phone and other communication devices as far away from cables, speakers, and effects as possible to prevent or reduce interference.
3.Playing habits
If your instrument, device, and cable are working properly, you will notice a significant decrease or disappearance of current noise when your hand touches the strings or other metal parts. This grounds your device to reduce or eliminate noise. When you are not playing, touch the strings with your hand or turn down the volume knob.
4.Power supply
(1) We recommend that you always use the original power supply. Since third-party power supplies are not optimized for our products, they are likely to introduce current or other noise that will prevent the device from working properly. Ifyou have to use a third-party power supply for some reason, carefully check that the power supply specifications meet the device requirements before use.
If the original power supply is lost, check an instrument or electronics store to buy a replacement.
(2) Since our products use a three-plug power supply, before you use the device, please make sure your power outlet (including wall plugs and power strips) is properly grounded to minimize noise.
(3) If your power environment is supplying multiple devices, try using a power filter/conditioner or reducing the complexity of your power environment to minimize noise. For example, when a colleague once used Ampero and plugged in an electric heater on the same power strip, Ampero's current noise instantly increased. If you experience this problem, be careful notto plug in a large number of unrelated devices to the power outlet where you connect Ampero.
Please also note that:
(1) There has been feedback from users that Ampero has a loud current noise (or even a slight electric shock) when used alone, and that connecting the USB cable to the computer returns to normal because after connecting Ampero to the computer via a USBcable, Ampero becomes grounded via the USB cable (the computer is grounded).
(2) There are times when you experience the opposite: the original is working properly and the current sound of Ampero suddenly increases once connected to the computer, which may be interference with Ampero by the computer USB interface. At this point, try checking your computer. Even if it's a desktop computer that’s grounded, some poorly designed motherboards or computer power supplies can cause noise or even personal safety issues. If it’s a laptop you can try unplugging it to see if that helps.
(3) In some cases you may have toisolate the ground wire of the Ampero power supply; see below for details.
(4) For Ampero One users, if you need to use it frequently in complex power supply environments, we recommend that you purchase a Darkflux mobile power supply to power Ampero One to minimize the possibility of power supply noise.
(5) Effects Chain
In some connection methods, Ampero's underlying noise may increase abnormally if the effects chain is not set up properly. Note the following:
(1) When you connect Ampero totheamp Input jack, you need to turn off Ampero's AMP and CAB modules, otherwise there will be a double AMP plus double CAB. When the undertone from the instrument is amplified multiple times it will result in significant hum, and the tone will not be normal.
(2) When you connect Ampero tothe amp Return jack, you need to turn off Ampero's CAB module (which can be done in Global Settings-Inputand Output) or there will be a double CAB phenomenon, where the undertone from the instrument is amplified multiple times and causes a noticeable hum and abnormal tone.
(3) When you plug Ampero into the amp Aux In jack, you need to confirm that your amp speaker is full-frequency when using the Aux In interface, and if not, you need to turn off Ampero's CAB module (which can be done in Global Settings - Input and Output), otherwise there will be a double CAB. The undertone noiseis obvious because it is amplified multiple times, and the tone is also abnormal.
Fixed frequency noise
Ampero may experience one or more fixed-frequency noises when used with devices such as mixers with their own amplifier, tube speakers, speakers with grounded power supplies, etc., which is generally caused by the ground loop. Ground loop occurs when multiple devices are connected to a common ground via different paths. First, you'll need to verify that the device you're using uses a three-plug power cord and is properly grounded, and if so, you'll need to purchase your own three-plug, two-socket to isolate the ground wires of your Ampero power supply, or isolate the two from each other to eliminate noise from the ground loop.
Intermittent low-frequency hum
This is generally due to the threshold set by the Noise Gate in Ampero presets, which is just above the threshold. This can be adjusted as needed.
Crackling
Sometimes you hear crackling when using some high-powered instruments with Ampero or when some effect parameters are extreme, which is usually caused by an internal signal overload. We'll include input and output level indications in future firmware upgrades to indicate the signal level and whether it's overloaded to help you better adjust your tone.
3. I wish Ampero and Ampero One had more footswitches
Try using Ampero with Ampero Switch to unlock more features. Alternatively, for Ampero, you can externally connect midi controllers to expand your options. You can learn more about Ampero Switch by clicking on the link below: https://www.hotoneaudio.com/products/controlers/Ampero-switch
4. What are the power requirements for Ampero, and Ampero One? If my original power supply is accidentally lost, how do I choose the right power supply?
We recommend that you always use the original power supply. Third-party power supplies are not designed for our products any may introduce current noise or other noise, resulting in the device is not working properly.
If you have to use a third-party power supply for some reason, choose a power supply based on your device that meets the following specifications:
Ampero: DC 18V internal and external positive power supply, output current needs to be greater than 500mA, AC end plug requires ground connector; DC end plug size: 5.5mm X 2.1mm
Ampero One: DC 9V internal and external positive power supply with output current greater than 500mA and DC end plug size: 5.5mm X 2.1mm
5. How do I download the latest version of firmware and software?
Then, find the firmware or software options in the left column. When you click on it, the right column will display the available updates:
You can type keywords to search, or you can manually select product categories (multieffects) and product names (Ampero or Ampero One; note that Ampero has several different versions) to filter the firmware or software you need.
The higher the number of the version, the newer the software/firmware.
6. What happens to the IRs of Ampero and Ampero One?
Ampero, like Ampero One, supports 1024 IR sampling, which is approximately 23ms in length. That is, no matter how long the user's IR file is, Ampero will only take the first 23ms of content, and if the user's IR file length is less than this value, it will be processed at the actual length.
7. Why do the effects parameters I’m using jump around without me changing them?
Check in the control settings interface whether the effect parameters moving around are controlled by the built-in or external expression pedal. If you do not need the parameters to be controlled by the expression pedal, they can be cleared from the control items linked to the expression pedal.
In addition, if you use a built-in or external expression pedal to control a parameter, when your pedal stays in the middle tread position, the controlled parameters may move within a very small range, because the host may detect slight changes in pedal travel, which is normal. If it’s influenced by the beat, for example, the movement range depends on the pedal's angle or pedal electronics accuracy.
8. How do I make a firmware update?
See the Firmware Update Guide on the official website.
9. How do I import/export presets on Ampero/Ampero One?
Connect Ampero/Ampero One to your computer, open the Ampero Editor editing software on your PC, click "Import" or "Export" in the upper right corner of the software interface. Files will feature the preset extension suffix, “prst.”
After the import is successful, the first preset of User Presets will automatically become the preset you imported, and as you continue to add presets, you will need to select the User Presets column (click on the original preset you want to replace) and then import.
10. How do I import a third-party IR file in Ampero/Ampero One?
Connect Ampero/Ampero One to your computer, open the Ampero Editor editing software on your computer, click on the CAB module in the software interface effect chain, click "Import IR Files" next to the effects list, and select an IR file (WAV format) to import.
Ampero/Ampero One provides ten blank IR locations. Remember to not overwrite previously imported IR files when importing new IR files.
11. How do Iadjust the Ampero/AmperoOne pedal?
Consider recalibrating the expression pedal if the effect changes significantly when you use it or when you press the pedal lightly.
Click Control Settings - Expression Pedal 1 Settings – Calibrate, and calibrate as prompted.
The expression pedal 1 is the built-in pedal and expression pedal 2 is the external pedal.
12. How do I use the expression pedal on Ampero/Ampero One?
First, activate the expression pedal (the default is the volume pedal when not activated). Press the pedal hard to enter the expression pedal function.
Second, click Control Settings - Expression Pedal 1 Settings - Control Object, and select the target module, target effect, and target parameters in the parameter bar.
In the case of wah effects, when using the expression pedal as a wah pedal, you first need to add the wah effect to the FX1 or FX2 module of the signal chain and assign the Range parameter to the expression pedal, at which point you can hear the effect by turning on and using the expression pedal.
13. How do different instruments connect toAmpero/AmperoOne?
Ampero has three input options for different instruments:
1. E.GT: For electric guitar/electric bass
2. A.GT: For acoustic guitar or any acoustic instrument
3. LINE: For keyboard instruments such as electric piano, synths, etc.
Ampero One reduces the instrument input selection switch design, but it has a special input interface with extremely high input impedance (up to 4.7M Ohms), which can handle all kinds of instruments. As a result, Ampero One does not need any input adjustment and can be used with electric guitars, electric bass, and acoustic and keyboard instruments.
14. When do I need to turn the Cab module on/off for Ampero/Ampero One, and how does No Cab mode turn on?
When you connect Ampero/Ampero One to the amp Input, we recommend that you turn off Ampero's AMP and CAB modules for best results.
We recommend that you turn off Ampero's CAB module to avoid adverse effects to tone when connecting Ampero the amp RETURN jack or the input of a power amp, such as Loudster.
When you connect Ampero/Ampero One to full-frequency audio devices such as mixers, audio interfaces, headphones, etc., we recommend that you turn on Ampero/Ampero One's AMP and CAB modules for best results.
In global settings, you can turn on No Cab so that the cabinet effect remains turned off when you switch presets. Method: Global settings - In/Out - Page-turning – No Cab mode (left/right) - Select Off/On
When you connect only one speaker or produce a mono output signal, we recommend that you prioritize the left channel output interface of Ampero/Ampero One.
15. How is Global EQ setup?
Global EQ is used to set the overall equalization on Ampero. You can access this in the Global Settings of the Ampero/Ampero One main interface, or in the Ampero Editor editing software (icon is located to the right of the drum machine speed).
Global EQ changes Ampero's overall tone, and the Switch option switches the global EQ on (which is turned off by default). Low frequency/high frequency points and low frequency/high frequency gain are used to set the frequency and gain of the low frequency/high frequency shelf filter. The mid frequency point and mid frequency bandwidth are used to set the midrange frequency point and bandwidth (Q value, range 0.1-10, the larger the number, the narrower the bandwidth). The mi frequency gain is used to set the gain of the MID filter. Volume is used to set the output volume, which ranges from 0-100 (default setting is 50).
All frequency and gain adjustments have the same range:
Frequency adjustment range: 20Hz-999Hz (1Hz per step), -1.0kHz-20.0kHz (0.1kHz per step).
Gain adjustment range: -12dB to +12dB
16. How do I record audio using Ampero?
Record audio with your phone: Use an OTG cable to connect your phone to Ampero/Ampero One, turn on recording on your phone, or tap record on your video app.
Record with an external audio interface: Connect the output of Ampero/Ampero One to the input of the external audio interface, turn on your DAW (Pro Tools, StudioOne, etc.) to select an external audio interface in the audio hardware options, and tap Record to record. Using Ampero/Ampero One as the audio interface: Download and install the Hotone USB ASIO driver V5.0.0 from the official website. Connect Ampero/Ampero One to your computer, turn on your DAW, selects "Ampero Audio" in the audio hardware option, and click Record to begin recording.
Hotone AI Customer Service
Hello! I am Hotone AI Customer Service. How can I help you?